Showing posts with label tutorials. Show all posts

Wednesday, July 13, 2011

What I've learned today


I always loved photography. Always. And when on my 17th birthday I've got my Nikon D40 I fell in love with it immediately. I loved holding it in my hands, loved to carry it with me everywhere, and I was happy like a puppy if I could take one good snapshot. It was easy enough to understand the basic functions of this camera but I've never got into details (I didn't even read the manual *blush*). Two years passed and during this period I bought external flash and a 18-105 mm 3.5 lens. I was VERY happy. But one day, looking at my photos I wasn't satisfied with them anymore, I wanted something more. And then crazy researches started. I was searching for the camera that could fulfill all my expectations without leaving me bankrupt. And then I saw Nikon D700...........and decided that whatever it takes I am going to own that camera. I couldn't sleep, couldn't eat and even think! And then during one month I managed to save enough money to finally purchase it. When this babe arrived home I knew that I made the right choice. LOVED it at first sight. BUT there was a problem. Despite my great love to photography I didn't know how to use it. Yes, that's right. I still didn't read the manual (of both of the cameras). My mum suggested me to go to take photography classes but I didn't want. I don't know why but I thought that people telling me how to shoot wouldn't benefit me a lot. So I started buying books. LOTS of books. And magazines too. And after a while I started to understand what is ISO, DOF, white balance, bracketing, etc. This knowledge made my photos better. But there are still a whole lot of things I need to learn. The reason I decided to post this on my blog, is that all these terms can be very confusing sometimes therefore I'll be writing what I learned new and be posting here at the same time checking if I really understood what I learned (sounds crazy, huh?). Let's start our journey.

Lesson number 1: Don't shoot your models/objects when sun is shining right on them

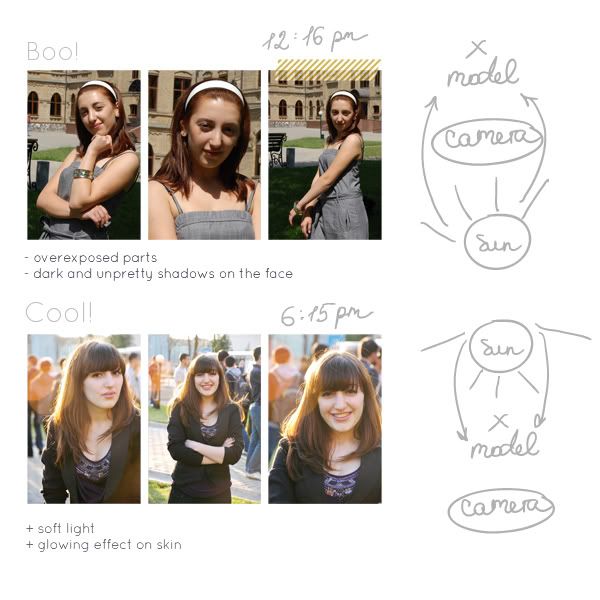
Don't know why but I always thought that when sun is shining right at your object is good. No wonder I kept taking horrible overexposed photos. And then after doing a research and much practice I got it right. It turns out that the sun should be behind your models/objects, not behind you - photographer. Then there will be a beautiful glowing around your model (especially hair). Also if you want your photos to have smooth natural colors it is better to take photos in the morning or late afternoon. NOT between this time. Plus use a little impulse of your flash - it softens shadows on the face.

Didn't process the photos so you could see the difference.These pictures were taken by me with the same girl, same camera and lens! But at different time and different place of model. Amazing how little details in photography can play such an important role. Hope you find this information useful. If you I have more to add just leave a comment under the post. I will really appreciate that :)

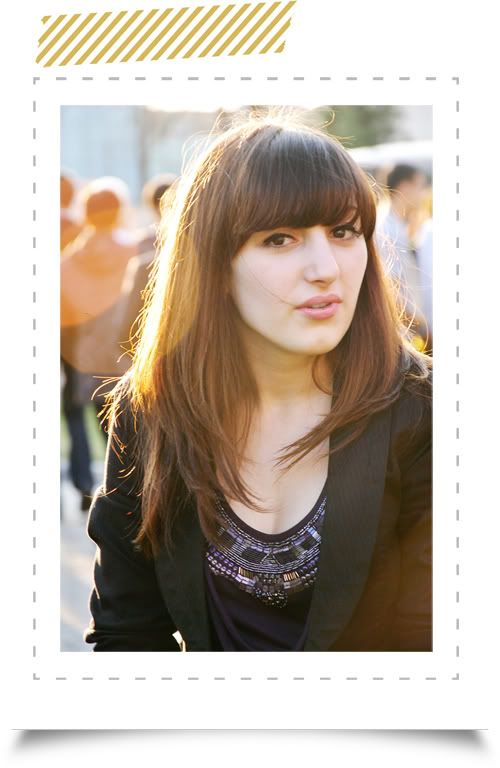
And here is a bigger, processed (a little bit, left the face) version of one of the photos:

xoxo

P.S Sorry for messy graphics. Hope you still could understand. AND I am not a pro. Don't judge me too strict :P

Frame and tape from Cut and Paste by Paislee Press

Tuesday, July 12, 2011

Top Ten Fonts Every Scrapbooker Should Know {Link Lovin'}


I've been thinking a lot lately if fonts play an important role in our projects and the answer is - DEFINITELY YES! I analyzed my older layouts (when I didn't pay any attention to the title work and journaling, in fact some of my layouts even miss both of these elements) with the newest ones and I can clearly see the difference between them. Layouts with a stylish and interesting title and text are more fun than just a plain text or even nothing! I noticed that as soon as I downloaded some of the fonts (that immediately became my favorite ones) I LOVED to do titles and journalings in my projects. There are plenty of options available at different sites and stores (and be ready to spent from 30-700 dollars cause fonts were never cheap) though I mostly use free fonts. So I decided to share with you gals my fav free fonts that are available at web. BUT if you need to use them commercially just contact the author for license and pay the (mostly) nominal price.

IMPORTANT: Usually free fonts are for personal use only unless otherwise is stated, so be careful!

In no particular order:


Illustration © zetafonts

Love this font for childish handwriting which is perfect for your fun, bright and whimsy layouts. I use it again and again and again. Never tired of this one for sure!
Here are some of my pages using this font:

Lobster


I bet you have seen a lot this one already! Love the unusual look of this one and the way letters are connected. Very stylish!

League Script #1

The font was made by Haley Fiege. Love this script of 20s with a hint of modern! My blog title posts are also in this script.

Code Free Font

This font will be perfect for making logos and clear titles, or perhaps for some serious projects too.

Ostrich Sans


This font was made by Tyler Finck. Love that there are bold, thin and dotty variations in this pack!

Some Weatz

Illustration © Måns Grebäck

Just look at this script with that swashes! Gorgeous! Here is font in action:


Folk

This font makes me SO happy! It is great for titles of your albums, or just as titles of your pages! Also it contains different variations: outlined, sketchy, etc. Just go to the site and check it yourself. You won't be disappointed.

Baurete

F-U-N! Isn't it? This is one great for artistic titles! Or make a wordart and print it on your t-shirt! (that would be even cooler)

LOT


Isn't this one COOL? I think of a high fashion and magazines when I look at this one. Want to spice up your layouts and make them extraordinary? Then this is a good option.

Gimme Space (not free)


Look at this cutie! Created by Lauren Reid and Darcy Baldwin. If you like to do lengthy journaling but still want to be able to read what is written on the page then go with this font.
Here is my layout using this font:
I do really hope that this post was helpful for you ♥ Please don't forget to leave some love for the authors of the font.

Here is how to install a font for Windows and Mac.
xoxo

How to rock digiscrap world {Part 2}

How to rock digiscrap world {Part 2}

So now when you have fans, people recognize your designs and there is a DEMAND, you need to search for shop where your designs would fit. And this is a VERY important step. Why? Because making your products in the shop (setting the product, adding description, images etc) is time-consuming, well, at least for me. And when you are jumping from shop to shop imagine how many times you need to go through that process again and again. Moreover it can be confusing for people that want to buy your goods but they are not sure where they can find you. SO as soon as you decided to settle up in a certain shop think very carefully if you would enjoy your stay there?

How am I going to find a store where I would sell?

Usually stores announce that they are hiring designers. You can find these announcements on store’s blog or via blogs of other designers. Or you may register at sites like Digishoptalk.com where there is a special forum for designers and store owners. Usually there you can find a bunch of announcements. OR if you really like the shop and you REALLY would like to settle there just write the owner of the shop. There is a small possibility that they may take you because mostly shops are full and the digital space for products is very limited or money worthy so store owners are forced to be strict in taking more designers on board BUT sometimes for some reason they do take you.

As soon as I settled up in a shop what should I do next?

It may sound cliché but be friendly with the people in the shop – designers, CT members, admins and most important customers! Participate in forums and leave comments in gallery. Show your ‘face’ in a scrap land as more as possible – it is good for you and your popularity level.

That's all for now but stay tuned, part 3 is coming *wink wink*

Wednesday, July 6, 2011

How to rock digiscrap world {Part 1}

So you loved digiscrapbooking and now you feel like you are ready to show your talent to the world? BUT you don’t know HOW? There are so many questions about starting designing and I’ll try to answer them in my blog post, however that does not mean this is the only way to go – it’s just how it worked out for me.

First of all you NEED to have a blog. THIS IS A MUST. Blog is a tool which would connect you with the world, your fans, your readers, your future customers etc. Therefore it is important the way you are gonna ‘structure’ it.

How am I going to draw readers to my blog?

Your blog should be interesting to read. When I started designing I was posting about my life and from time to time I was making mini freebies and giving them for free. This helps to get additional readers and followers. But it is also important because people will know your style. Try to make your post visual. Post images and photos. It would be even better to post the photos you’ve taken yourself. Tell about things that excite and inspire you. Why? Simply because people would like to know who you really are, what person makes their favorite designs.

Hint: Post your free samples at ‘freebie’ sites such as Digisrapdepot.com, Digishoptalk.com etc. and link them back to your blog.

Keep checking back for more!

xoxo

Wednesday, January 12, 2011

Introduction To The World of Digital Scrapbooking Part 1

Image and video hosting by TinyPic
I have been asked for several times to introduce some basic information about scrapbooking to the people who have been recently introduced to the wonderful world of digital scrapbooking. That is not surprising because back in 2008 I didn’t know what scrapbooking is myself. I was doing something similar but it was rather collage making than scrapbooking. First of all scrapbooking goes much deeper than collage: every scraped page has a story to tell. And I think recording the most beautiful pieces of your life is very important for you, for your family, friends, etc. And it is a unique way of expressing yourself. So if you haven’t started digital scrapbooking yet I strongly advise you to. It is the best hobby you could think of!
Image and video hosting by TinyPic

The first thing you will need to start is proper software. I use and used for a long time Adobe Photoshop CS3 – 4, and I have tried Adobe Elements 7 too. But you can start with some basic software like My Memories Suite, Digital Scrapbook Artist, Hallmark Scrapbook Studio, and others. Further information and details you can find here (including reviews and purchase on-line).

Image and video hosting by TinyPic

As soon as you have got the software you will need some graphics to embellish your pages. Then you can go to an on-line shop that provides the high quality digital products. Usually the kits are consist of elements (in .PNG format) and backgrounds (in .JPG format) all created at 300 .dpi for the best print quality. There are some tagger kits too: the elements are of a smaller size with 72 .dpi resolution. Basically they are used for posting the pages in the web but not for printing. Visit this page for more information about the tagger kits.

Image and video hosting by TinyPic

The thing I loved about the digital scrapbooking is a large amount of freebies! Some designers make really cute stuff and they let you download it for free. Check out these sites: DigiScrapDepot, Hand Picked Freebies, MScraps, or simple just check my blog.

As long as you have something to create with start to experiment, recolor, change the size, move and alternate the elements on your page. If you don’t know how search for the tutorials on web: there are tons of them and all can be really helpful in discovering digital scrapbooking.

Hope you found this information helpful,

Much love,

Asal